メールはターミナルで - Mutt
(更新日時 )
Muttを使おう
Fastmailに移行したのを機に、MUAでも取り換えるかと思ってしばらくは以前 使用してた GyazMail を使っていたのですが、どうもしっくりきません。
いままで一番しっくり来たメールと言えば、Emacs上でMewです。 しかし、現在はエディタをVimに乗り換えたのでメール だけEmacsというのも不自然です。
ってことで、 Mutt を使うことにしました。
MuttはテキストベースのUNIX向け電子メールクライアントで、「マット」と呼ばれている ようです。Muttは大半のメールファイル形式に対応しており、特にmboxとMaildir 形式扱えます。MIME対応もあり、特にPGP/GPGやS/MIMEへは完全対応しているようです。
基本的にMUA( Mail User Agent )で送受信の機能を持ちませんでしたが、現在は IMAP/POP3/SMTPに対応しているようです。
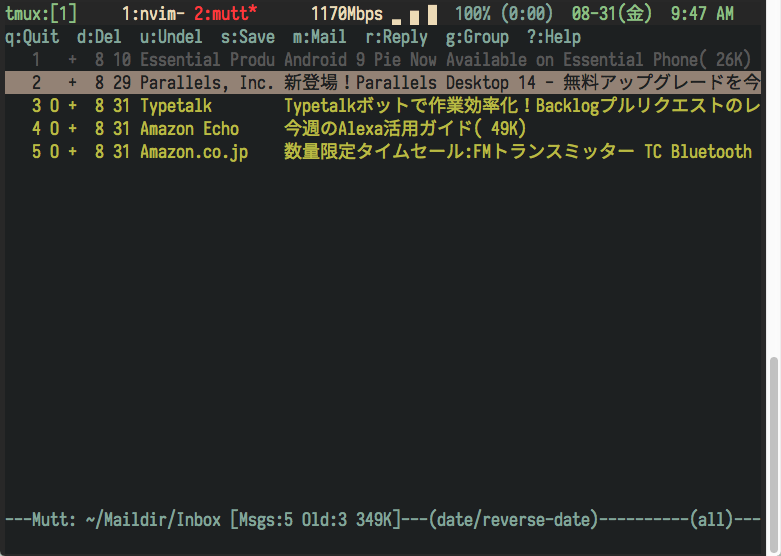
Muttのインターフェイス
上記のようなインターフェイスで、メール作成時にはデフォルトのエディタが 起動するのでVimでもEmacsでも好きなエディタを使用できます。
Macにisyncをインストール
わたしはFastmailをIMAPで使用したいのですが、一番手軽なのはMuttで IMAPの定義をすることです。ただし、この場合毎回リモートでアクセス することになるので、Muttの使い勝手が半減します。
調べると、getmailやfetchmailで受信してmuttと連携する例がよく 説明されています。POP3ならばこれでよいのですが、IMAPだとリモート とメールが同期しないので色々と不都合があります。
あまり日本語の例がなかったのですが、Muttの作者が作っているiSycn を改良したmbsyncというIMAPと同期させる ツールがあるので、これを利用します。Homebrewでインストールできます。
isyncでインストールしますが、インストールされるコマンドはmbsyncです。
設定は以下のようにします。
Create Both
Expunge Both
SyncState *

IMAPAccount fastmail
Host    imap.fastmail.com
SSLType IMAPS
User    yourmail@fastmail.com
# PassCmd "security find-generic-password -s mbsync-fastmail-password -w"
PassCmd "security find-internet-password -w -a yourmail@fastmail.com -s 'imap.fastmail.com' ~/Library/Keychains/login.keychain"

IMAPStore your-remote
Account   fastmail

MaildirStore your-local
Path    "~/Maildir/"
inbox   "~/Maildir/Inbox"

Channel your-inbox
Master  :your-remote:
Slave   :your-local:
Patterns  "INBOX"

Channel your-trash
Master  :your-remote:"Trash"
Slave   :your-local:Trash

Channel your-sent
Master  :your-remote:"Sent Items"
Slave   :your-local:Sent

Channel your-posponed
Master  :your-remote:"Drafts"
Slave   :your-local:Drafts
パスワードをそのまま書いてしまうのは問題ありますので、MacのKey Chainに パスワードを格納して呼び出すようにしています。
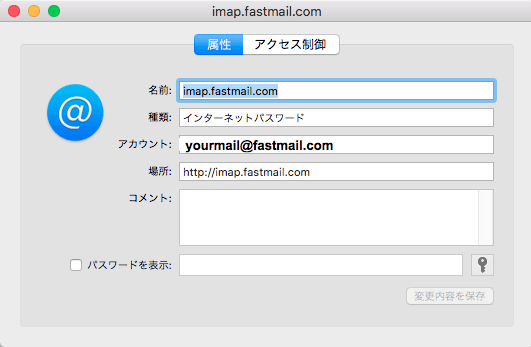
キーチェーンの設定
キーチェーンの設定は上記のようにします。'http:'で始めるのがテクニックの ようです。
ここまで設定できれば、コマンドラインで mbsync -a とやれば メールを受信して ~/Maildir に格納してくれるはずです。
MacでMuttの設定
MacにMuttをインストールするには、 Homebrewでインストール可能です [Ref1] 。
Muttの設定は、 ~/.mutt/muttrc に行います。
set realname = $MUTT_REALNAME
set use_from = yes
set signature = ~/.mutt/signature
# set envelop_from="yes"
set sleep_time = 0 # フォルダの切り替えが速くなります。
set record = +record # 送信メールの保存
set postponed = +postponed
set sort_aux = reverse-date
set assumed_charset="utf-8:iso-2022-jp:euc-jp:shift_jis" # 文字コード指定がなかったりする場合のために優先順位を設定しておきます
set header_cache = ~/.mutt/cache/ # ヘッダーキャッシュをしておくとフォルダの切り替えがだいぶ良くなります。

source ~/.mutt/colors/gruvbox-16

# HTMLメールを自動で見易くするための設定です。.mailcapも参照。
auto_view text/x-vcard text/html text/enriched
set mailcap_path=~/.mutt/mailcap

# メールボックス設定
set mbox_type="Maildir"
set folder="~/Maildir/"

set spoolfile= +Inbox
mailboxes = +Inbox
set sort_aux = reverse-date
set postponed= +Drafts
set trash = +Trash
set record = +Sent
mailboxes = +Sent
mailboxes = +Trash
mailboxes = +Friends
folder-hook  +Friends source ~/.mutt/friends
mailboxes = +Temporary
macro index G "!mbsync -a^M" "Update through mbsync"
set move = no
set my_user=$MUTT_EMAIL_ADDRESS
set my_pass=`security find-generic-password -w -s mutt -a "$MUTT_EMAIL_ADDRESS"`
set from=$MUTT_EMAIL_ADDRESS
set smtp_url=smtps://$my_user:$my_pass@smtp.fastmail.com
set ssl_starttls=yes
set sidebar_format = "%B%?F? [%F]?%* %?N?%N/?%S"
set mail_check_stats
bind index,pager \CK sidebar-prev
bind index,pager \CJ sidebar-next
bind index,pager \CL sidebar-open
bind index,pager B sidebar-toggle-visible
set sidebar_divider_char =  '│'
これで ~/Maildir に格納されたメールをMuttで閲覧できます。 メールの送信は、MuttからSMTPを直接たたいています。mbsyncと同様に ここでもパスワードはキーチェーンから取得しています。
また、環境変数に名前とメールアドレスが設定されている前提になっているので、 .bashrcなどに以下の設定を加えてください。
export MUTT_EMAIL_ADDRESS = "yourmail@fastmail.com"
export MUTT_REALNAME = "Hogehoge Hagehage"
alias mutt=neomutt
上記の設定で、Mutt上で SHift-Gを押すと自動的に mbsyncが動いて メールを取得してくれます。
脚注
2018-09-01 日本語化されていたので Muttから NeoMuttに移行しました。